Recipe Sprouted whole wheat bread
This is a recipe I have been working on for quite a while. I have seen many recipes with sprouted wheatberries in the dough but non of them did a fermented version. It is inspired by a fermented Rye paste we used in the bakery where I was working a couple of years ago. It was a thick paste which we ordered in big buckets of 20 kg, these where added to the dough and while mixing the berries where partly mushed and integrated in to the dough, while the other part was still intact and gave the bread a nice chew.
The berries together with the whole wheat flour in the bread give you a very filling and nutritious bread with all the flavor of a whole wheat bread.
To make this recipe the way I did with the sprouted and fermented berries you’ll need to start sprouting the wheat berries 4/5 days prior to mixing day. ill recommend to start 5 days before because when the berries are sprouted enough you can always store them a night in the fridge to stop them from over sprouting.
Ingredients:
Fermented sprouted berries
- 100 gram wheat berries (if possible organic)
- Water
- 70 gram starter
- 70 gram water
- 70 gram flour
Dough
- 1000 gram whole wheat flour (you could use fresh milled)
- 150 gram starter
- 20 gram salt
- 800 gram water (hold back +/-150 to see how your dough develops)
- 400 gram fermented sprouted berries
How to sprout your berries.
The sprouting process is quite simple. Start 4/5 days before you want to use the berries to make your dough, take 100 grams high quality organic wheat berries (from your organic store or even better your local mill) and rinse them with cold water, put them in a clean mason jar add plenty of water, then soak the grains in the water overnight so they can soften a bit to make the sprouting easier.
The wheat berries absorb a lot of water during soaking and they kind of double in size. In addition, you must also be able to wash the grain properly during the following steps. So make sure the jar is big enough.

The next morning, drain the water from the jar and rinse the berries a little. Let them drain till there is no more water pouring out of the berries and put them back in the jar, no extra water is needed now. The germination will be done by the water that is left on the wheat berries in combination with oxygen and warmth.
The berries should now be washed twice a day, you do this by filling the pot again with plenty of water, you then roll the berries through the water so that all berries come apart and are rinsed equally well. Then you pour the water out of the jar making sure no berries are lost, shake them once so that they are not too tightly packed and you put them on your countertop again.
Repeat these steps every 12 hrs until the kernels have sprouted as desired, I always let the sprouting process continue until the germs are about the same length as the kernels themselves.

Assuming you followed the recipe you will now have around 190-200 grams of sprouted wheat berries. To ferment these, mix them with your levain for the next day’s dough. Use 70 grams of starter, 70 grams of wholemeal flour and 70 grams of water for this and stir this together with the sprouted grains into a paste. Put this paste aside overnight so that it can develop nicely.


Dough method
To make the dough I used a spiralmixer but of course it is also possible to make the dough in a planetary mixer or by hand, just keep in mind that less or no grains will be crushed and your dough probably also absorbs less water.
For the dough, put all ingredients except the salt and 150 grams of water in the bowl of the machine. Let this mix on slow speed for about 6 minutes so that the flour can absorb the water well and the mixer can crush some of the wheat berries.

After mixing all the ingredients at slow speed it is time to take it a step further to really develop the dough. You now want the gluten to develop properly. At this point, add the salt to the dough, as the salt also provides a stronger gluten network. Knead the dough in 2nd gear for about 6 minutes until the gluten network starts to develop, at this point you can slowly add a little water each time until the dough has the right consistency. I used a total of 800 grams for the dough myself, but I think I could have added a little more.

After about 10/12 minutes of mixing on high speed, my dough had developed enough, it looked smooth, was pulling away from the sides and I was able to do the windowpane test. At this point, I put it in a dough container to start bulk proofing.
The bulk fermentation took me a total of 4 hours at a room temperature of around 20C. When it is warmer it will go faster and when it is colder it will take longer, during the bulk fermentation the dough got a total of three stretch and folds Which I did with intervals of 45 minutes. You just let the dough ferment in its container for the remainder of the bulk time.

When the bulk fermentation is over, divide the dough into 3/4 pieces according to the size of bread you want to bake, and shape them into a ball, the so-called preshape, be careful with the dough and make sure that the outside remains under tension without tearing. Place these balls with the seam side down on a couche or your preferred proofing surface and let this ferment again for 30 minutes to an hour, after which the dough shaping process will begin.
To shape the dough, sprinkle a little flour on your work surface very lightly and place the dough ball (if needed, with the help of a dough scraper) upside down on your work surface. Gently stretch it just a little bit without tearing your dough or squeezing too much air out of it, then fold the top 1/4 of the dough down to half of your dough. Then fold both sides inwards about 2/3 so that they neatly overlap and you get a kind of envelope idea.

Then gently roll your dough from the top towards you, still being careful not to squeeze too much air out of your dough. You’ll end up with a batard like shape in which you can stil see the swirl on the sides. If your dough still lacks good surface tension at this point, you can always roll it the other direction again, but for me this wasn’t necessary.
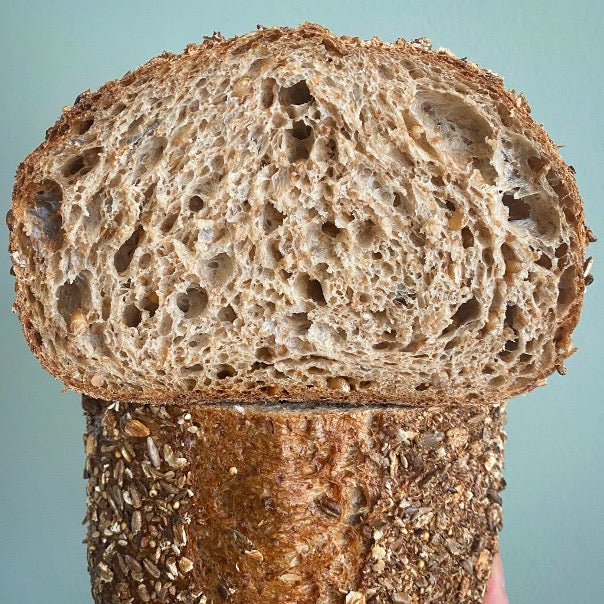
If you want you can also decorate your dough on the outside as I did in the photo below with wheat bran, but this can be done with many different things such as seeds, crushed grains but also just with a little flour. To make sure that the crushed wheat sticks to the outside of the dough, moisten it slightly with a spray bottle or roll the dough over a damp cloth and then in the decoration.
After decorating, place the dough in the bannetons or between a folded couche and place in the refrigerator overnight or let it proof at room temperature for another hour before baking.

Before baking, preheat the oven to 240C. I have a steam oven in my kitchen and about 10 minutes before I slide the bread in the oven, I put the steam setting on medium. If you don’t have a steam oven, preheat a bakingtray with some lava rocks on them to create the steam later.
Turn the bannetons over and roll your dough onto your baking paper, peel or pan, or transport your dough very carefully onto or into this. Score the top as desired and then quickly but carefully slide the bread in the oven. Make sure the oven can create enough steam for the first 10/15 minutes of baking. Leave the oven at the same temperature. After 15 minutes it is time to release the steam from the oven and lower the temperature to 215C then bake the bread for another 20-30 minutes until it is fully cooked and sounds hollow. Let the bread cool thoroughly before cutting to let the starches set and being able cut it without fully ripping your crumb apart.

If you bake this bread be kind enough to share it on social media with #bakingbreadnl and tagging me in it @baking_bread_nl